
Workshop tools fall into four broad categories: cutting, shaping, fastening, and measuring. Each group includes hand tools, power tools, and precision instruments for different materials and tasks. Choosing the right tool and maintaining it well affects both output quality and operator safety. This article covers the most common workshop tools, explains their main uses, and outlines the maintenance routines that keep them accurate and safe to operate.
Key takeaways
- A claw hammer (450–570g) is still the most-used general workshop hand tool.
- Change circular saw blades from 24-tooth for ripping to 60-tooth for finished panel edges.
- Use a combination square to check both 90° and 45° angles before every cut.
- Place scrap blocks between clamp jaws and softwood workpieces to avoid surface marks.
- Hardwood dust from oak and beech is hazardous — use an FFP3 mask and a dedicated extractor.
- Wipe steel rules, chisels, and plane soles with 3-in-1 or camellia oil after each session.
- Use 50–60% of a new tool’s price as the upper limit before replacing rather than repairing.
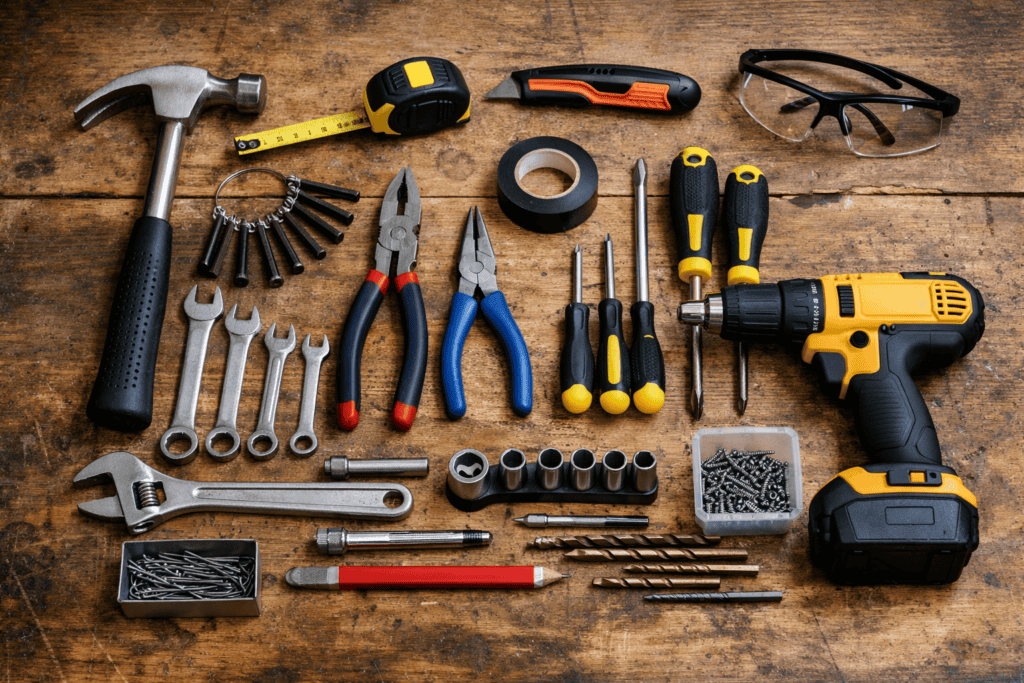
Hand Tools Every Workshop Should Have
Build your hand tool collection around function, not brand. A claw hammer (450–570g) drives and pulls nails, which makes it the most-used tool in any general workshop. Pair it with a cross-pein hammer for lighter joinery work, where precision matters more than force.
A set of chisels in widths from 6mm to 38mm covers mortising, paring, and chopping for most woodworking tasks. Keep them sharp with a combination waterstone. A blunt chisel needs more force and leaves rougher cuts. Stanley and Irwin both produce reliable entry-level sets that hold an edge well enough for regular use.
Measuring accuracy decides whether joints fit or fail. A combination square checks 90° and 45° angles at the same time and also works as a marking gauge. Add a 5m tape measure and a spirit level for structural or installation work. Screwdrivers with magnetic tips — at minimum a PH2 Phillips and a flat 6mm — complete the core set.
Power Tools for Cutting, Drilling, and Shaping
| Tool / option | Best use from the article |
|---|---|
| Circular saw with 24-tooth 185mm blade | Ripping and general crosscutting sheet material quickly |
| Circular saw with 60-tooth blade | Cleaner edges on finished panels |
| Corded drill-driver 550–750W | Extended drilling and fastening, especially masonry work |
| Cordless 18V Li-ion drill-driver | Comparable output in timber with more portability |
| Random orbital sander 125mm | Fewer swirl marks than a belt sander |
| Variable-speed jigsaw | Finer control on curved cuts |
A circular saw cuts sheet material up to four times faster than a handsaw. Fit a 24-tooth 185mm blade for ripping and crosscutting, then switch to 60-tooth for cleaner edges on finished panels.
A corded drill-driver at 550–750W handles most drilling and fastening jobs. Cordless 18V Li-ion models match that output in timber, but corded versions sustain power during extended masonry work. Brushless motors also run cooler and last longer under heavy use.
A 125mm random orbital sander leaves fewer swirl marks than a belt sander. For curved cuts, a variable-speed jigsaw (0–3,000 strokes per minute) gives finer control than a fixed-speed model.
- Angle grinder (115mm or 125mm): cuts metal, grinds welds, and strips rust. Keep a wire cup brush, cutting disc, and flap disc on hand.
- Plunge router: cuts dadoes, rebates, and decorative profiles. A 1/2-inch collet handles larger bits without flex.
- Bench drill press: keeps holes perpendicular at repeatable depths — essential for dowelling and metal fabrication.
Store batteries at 40–60% charge in a cool, dry location. Clear motor vents with compressed air every six months to prevent heat build-up.
Measuring and Marking Tools for Accurate Work
Errors in measuring and marking carry through every later step. A steel tape measure in 5m or 8m lengths covers most workshop tasks. For short measurements, 300mm and 600mm steel rules lie flatter and avoid tape hook flex. A combination square checks 90° and 45° angles at the same time. Run it along a board edge before cutting.
Marking knives leave a finer line than pencils on timber. They sever fibres cleanly and give hand tools a precise shoulder to register against. A marking gauge with a steel pin scribes consistent parallel lines. That makes it essential for tenon cheeks, rebates, and mortise positions. A sliding bevel handles angles outside the 45°–90° range. Store gauges flat to prevent warping. Check combination squares periodically against a known straight edge, as a dropped square can lose registration without visible damage.
Clamping and Holding Devices
- Let you position boards single-handed
- Faster to adjust during assembly
- Useful when handling longer boards or repeated repositioning
- Better suited to tighter spots
- Typically slower to tighten and release
- Less convenient when frequent repositioning is needed
If a workpiece shifts during cutting or drilling, cuts go off line and kickback becomes more likely. F-clamps suit panel work across 300mm–600mm spans, while G-clamps fit tighter spots. Quick-release bar clamps let you position boards single-handed. Pipe clamps spread pressure along a glue joint at lower cost per reach. Place a scrap block between the jaw and workpiece to prevent marks in softwood.
A bench vice mounts to the front edge of a workbench and leaves both hands free for planing, sawing, or chiselling. Fit wooden jaw liners to protect finished surfaces. The vice needs a rigid bench structure. slotted angle iron frames provide that rigidity without welded steel.
Toggle clamps suit repetitive routing or drilling. They lock and release with a single lever movement, which cuts setup time when the same cut repeats across multiple pieces. Check jaw alignment before a batch run. A misaligned toggle clamp shifts every workpiece by the same amount.
Workshop Safety Equipment and Practices
Wear ANSI-rated safety glasses when cutting or grinding. Add a full face shield for angle grinders and lathes. Hearing protection is essential above 85dB, and most circular saws and routers exceed that threshold in continuous use.
Hardwood dust from oak and beech is a hazardous substance under COSHH. Use an FFP3 mask and connect power tools to a dedicated extractor. For heavy components, a local lifting equipment company can supply certified hoists and gantry cranes. Overloaded or uncertified gear is a primary cause of crush injuries.
Keep floors clear of offcuts and spilled fluids. Store flammable solvents in a metal cabinet. Keep a CO2 extinguisher near every welding or grinding station.
- Lock out and tag out any machine before changing blades, bits, or guards
- Inspect power tool cables monthly — frayed insulation is a fire and shock risk
- Stock a first aid kit with wound closure strips, eye wash, and burn dressings
Cleaning and Lubricating Your Tools
Clean tools after every session. Sawdust and resin on saw blades increase friction, raise cutting temperature, and speed up tooth wear. Remove pitch from carbide blades with a dedicated cleaner and a stiff brush, then dry them thoroughly before storage.
Metal surfaces rust quickly in unheated workshops. After each use, wipe steel rules, chisels, and plane soles with 3-in-1 or camellia oil. For heavier rust on hand planes or vice screws, use 400-grit wet-and-dry paper before oiling.
Use the right lubricant for each task. Grease suits vice threads and drill press quills. Light machine oil works better on adjustment wheels, since grease attracts sawdust and clogs movement. Use PTFE dry lubricant on wood-to-wood surfaces such as drawer runners, where oil would stain.
Clear power tool air vents with compressed air every few months to prevent motor overheating. On brushed drill-drivers and sanders, check carbon brushes annually and replace them below 6mm. DeWalt and Makita publish service intervals in their manuals, and following them helps preserve warranty cover.
Storage and Organisation for Long Tool Life
Fixed storage spots prevent misplacement and protect cutting edges. Hang chisels and saws on a wall-mounted tool board to keep blades clear of other metal. Missing tools also stand out immediately. Foam or rubber drawer liners stop blades from sliding into each other — the most common cause of edge damage in shared storage.
Humidity is the main storage risk for metal tools. In an unheated workshop, swings in relative humidity can cause surface rust on bare steel overnight. Silica gel sachets inside drawers absorb moisture at low cost. Replace or oven-dry them every three to four months.
Store drill bits, router bits, and files vertically. Use horizontal racking for power tools to give them stable support and make access easier. Workshop racking and shelving sized to your inventory keeps heavy items at waist height and reduces dropping risk.
- Label each storage position so tools return to the same spot after cleaning.
- Store cutting edges facing away from open surfaces.
- Keep power tool cases closed when not in use to block dust from motors and vents.
- Inspect storage areas monthly for damp, pest activity, or corrosion on metal shelving.
Knowing When to Repair or Replace a Tool
Replace a cracked handle on a chisel or hammer instead of repairing it. Structural damage raises injury risk immediately. A stripped chuck, bent saw plate, or any damage to load-bearing parts belongs in the same category. Cosmetic wear, by contrast, rarely justifies retiring a tool that you can restore cheaply.
Use roughly 50–60% of the new tool’s price as the repair limit. Carbon brushes on corded drills and sanders cost under £5 to replace. If you ignore them, motor damage can make repair uneconomical.
Accuracy decides the issue for measuring and cutting tools. Replace a steel rule with a burred edge or a square that no longer sits true. Cleaning will not recover lost precision. Tape measures with stretched or kinked blades introduce errors that compound across a project.
If a tool needs the same repair twice within 12 months, it is signalling end of life. For power tools under warranty, contact the manufacturer before buying parts. DeWalt and Bosch Professional both offer authorised repair networks that preserve warranty cover.
Frequently Asked Questions
What are the most common workshop tools and what is each tool used for?
Workshops depend on a core set of hand and power tools. Hammers drive and remove fixings. Screwdrivers fasten or release screws. Tape measures confirm dimensions, while levels check alignment. Power drills bore holes or drive fixings quickly. Chisels, saws, and clamps cut, shape, and hold workpieces steady during assembly.
How should hand tools be cleaned and stored to prevent rust and wear?
Metal surfaces rust when moisture sits on them, so dry tools thoroughly after each use. Before storage, wipe blades and other metal parts with a lightly oiled cloth. Keep tools in a dry cabinet or tool chest, and cover cutting edges with sheaths or blade guards to prevent dulling and accidental contact.
What maintenance checks should be carried out on power tools before and after use?
Before each use, inspect the power cable for cuts, fraying, or exposed wires. Check that guards and safety attachments are secure, and make sure the tool starts and stops cleanly. After use, clear dust and debris from vents and moving parts. Then store the tool in a dry location to prevent moisture damage.
How often should workshop tools be inspected, sharpened or replaced?
Frequency depends on how heavily you use the tools. Inspect hand tools before each session for loose handles, cracks, or corrosion. Sharpen cutting edges — chisels, plane irons, drill bits — when resistance increases or finish quality drops. Replace any tool with structural damage immediately, since compromised tools increase the risk of injury.
Which safety practices help reduce accidents when using common workshop tools?
Five habits prevent the majority of workshop injuries: wear appropriate PPE, keep blades sharp, secure workpieces before cutting, store tools after use, and disconnect power before changing blades or bits.
Dull blades need excess force and are more likely to slip. Disconnect all power tools from their power source before adjusting guards, changing accessories, or clearing jammed material.